


 7 / 20


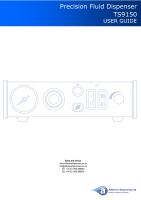
Setup for Testing
Power switch
❶
should be off.
The amount of material dispensed each cycle depends on the combination of air pressure, time of air
pulse, viscosity of material and dispensing tip size.
Note:
For watery liquids and Cyanoacrylates, refer to
“Making Timed Deposits of Watery-thin Flu-
ids”
on page 10.
The first step is to remove the tip cap from the pre-filled barrel of blue test material (twist and pull).
Replace it with an 18 gauge (green) tapered dispensing tip (#TTN18). Press the tip on and twist clock-
wise to lock.
Pull out air pressure regulator knob
❷
until it “clicks” into the unlocked position. Turn clockwise to ad-
just the air pressure to 30 psi (2.1 bar) for the initial tests.
Always set the pressure desired by turning the air regulator knob
❷
clockwise. To reduce the pressure,
turn the knob counter clockwise until the gauge
❸
reads a lower pressure than desired. Then increase
and stop at desired pressure. Push knob in to lock.
Set time control
❹
to #7. Dispense cycle time increases from 0.01 second minimum to 1.0 second as
knob is turned clockwise.
Be sure vacuum control
❺
is turned off (turn clockwise) for initial tests. Press power switch
❶
to turn
on the dispenser. It will light green.
Press timer bypass switch
❻
. It will light orange. In this operation mode, the timer will be bypassed to
fill the dispensing tip before you begin testing. A continuous flow of material will occur as long as the
foot pedal is pressed.
Please continue to page 8 for test procedures.
Sales and service
www.adhesive-dispensing.co.ukinfo@adhesivedispensers.co.uk